Hacking a Philips Smart Outlet
Posted on August 9th, 2023Teardown
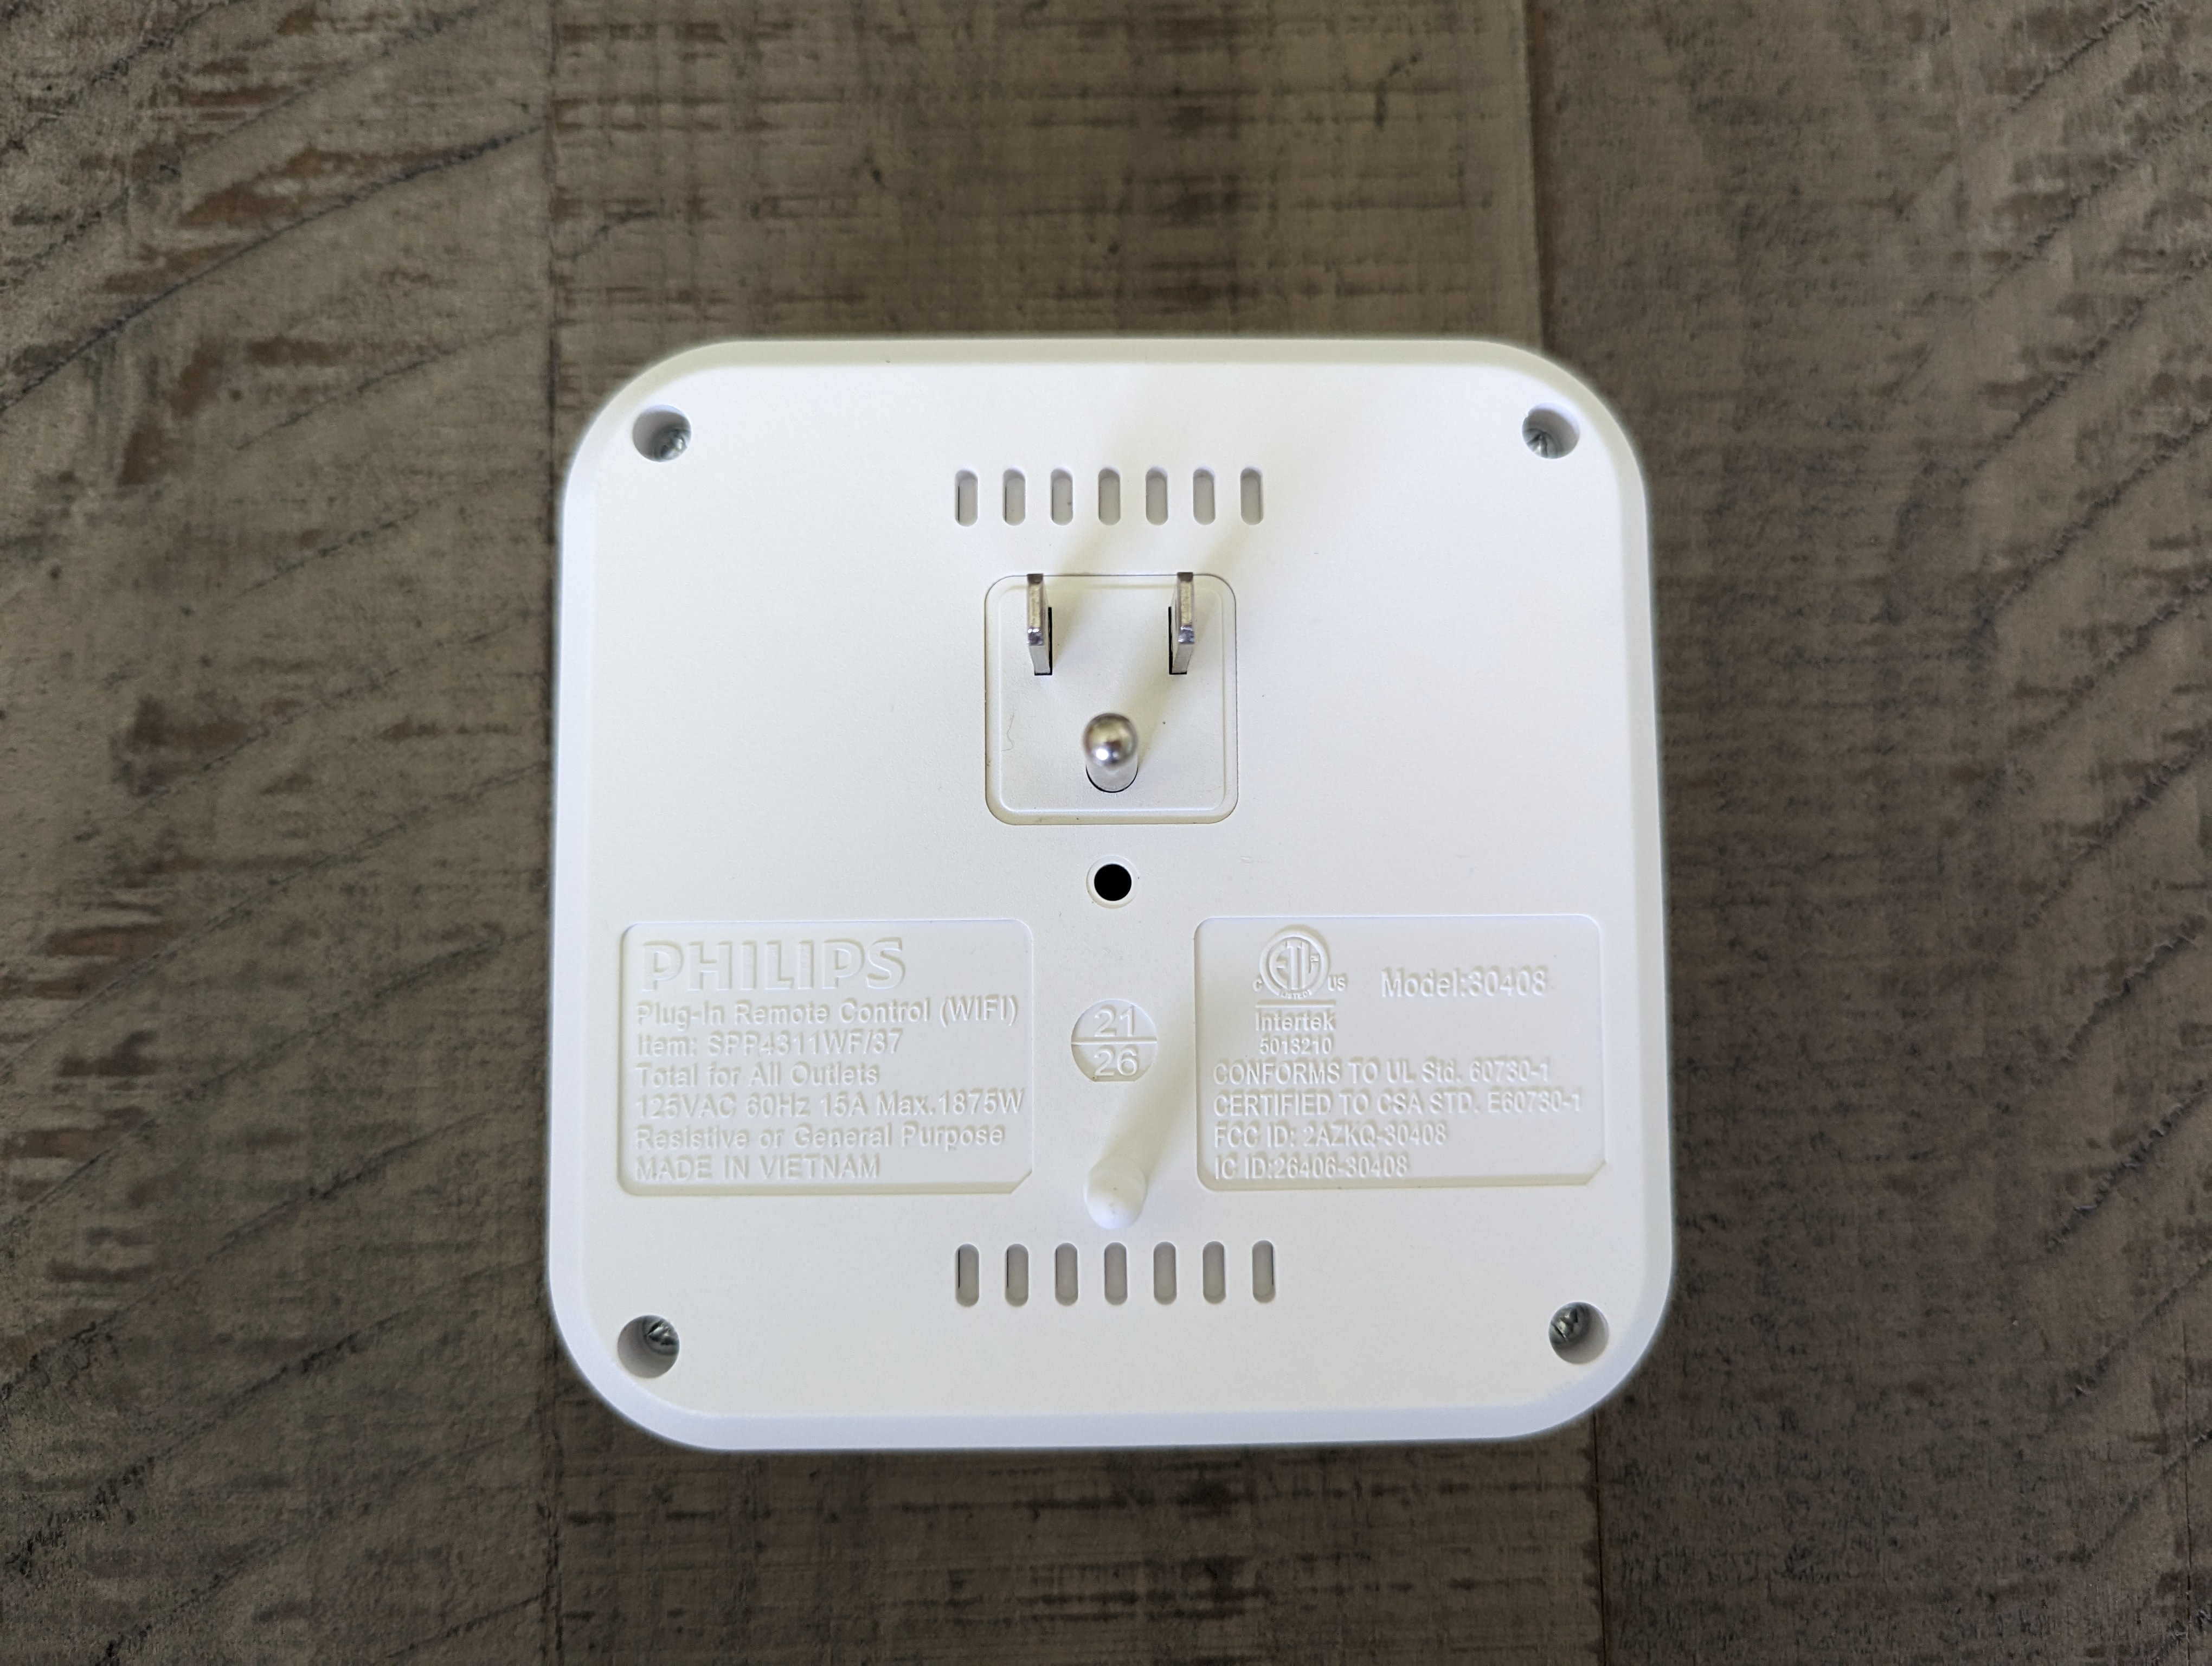
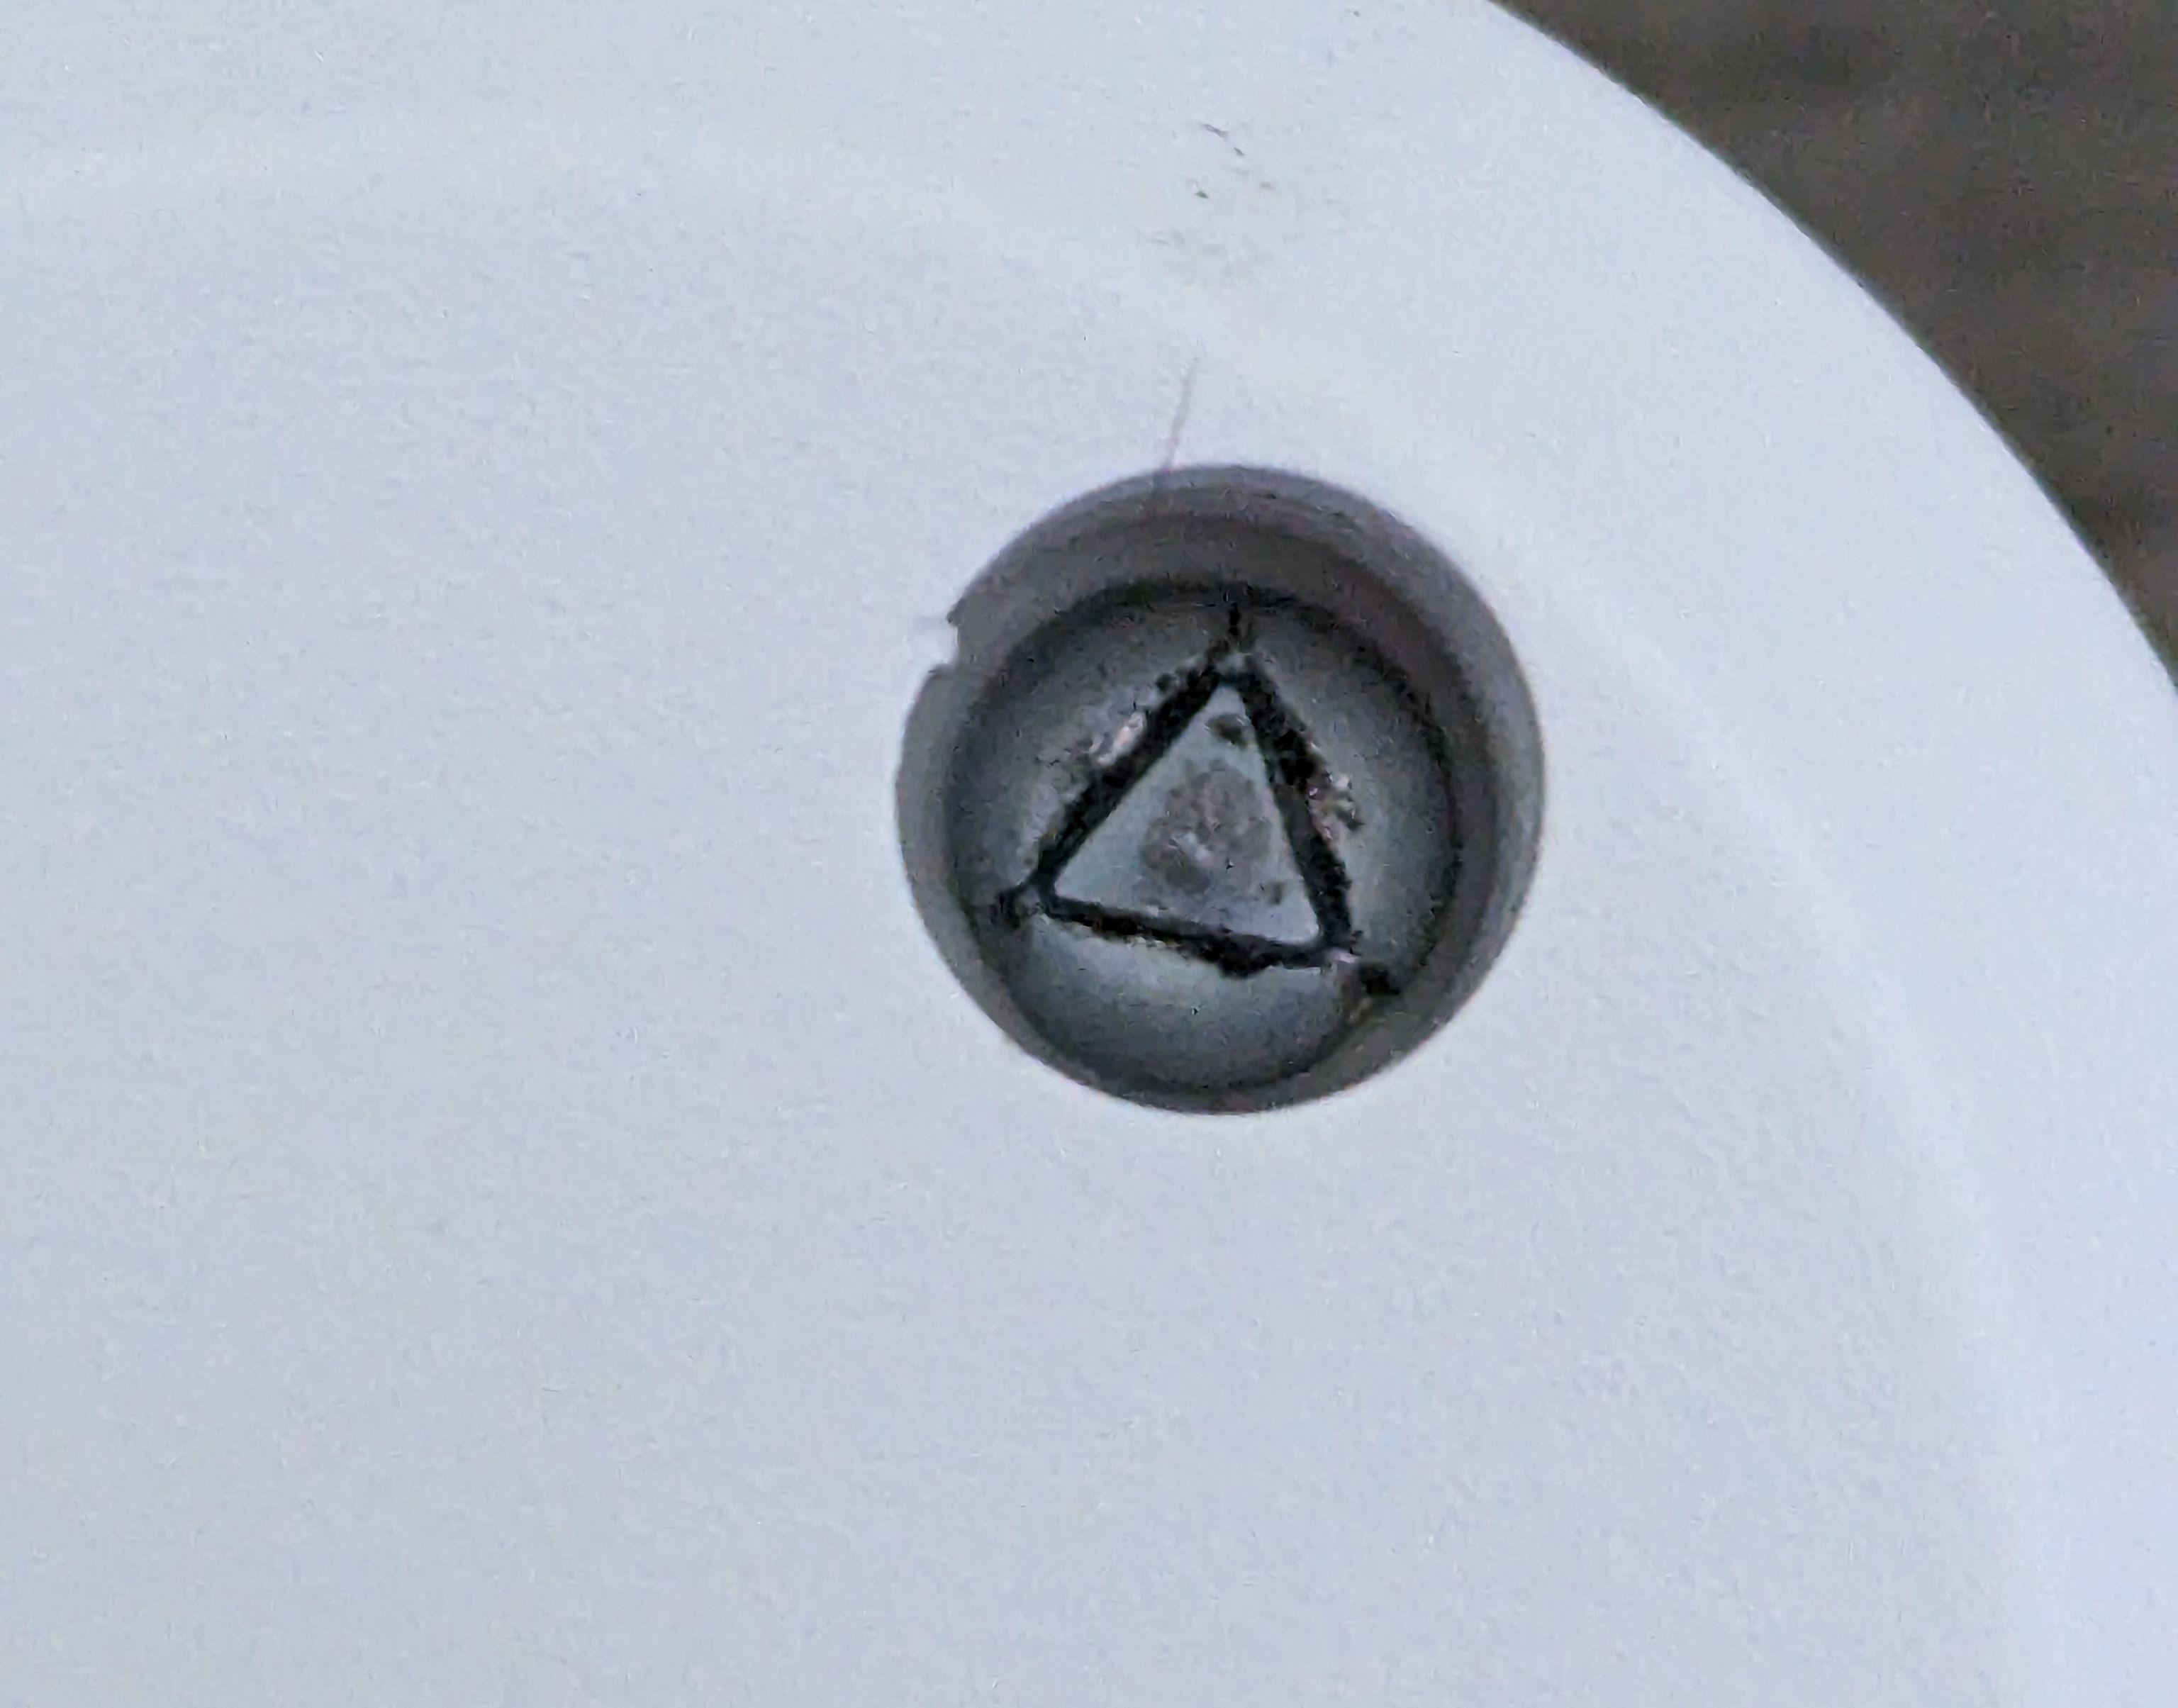
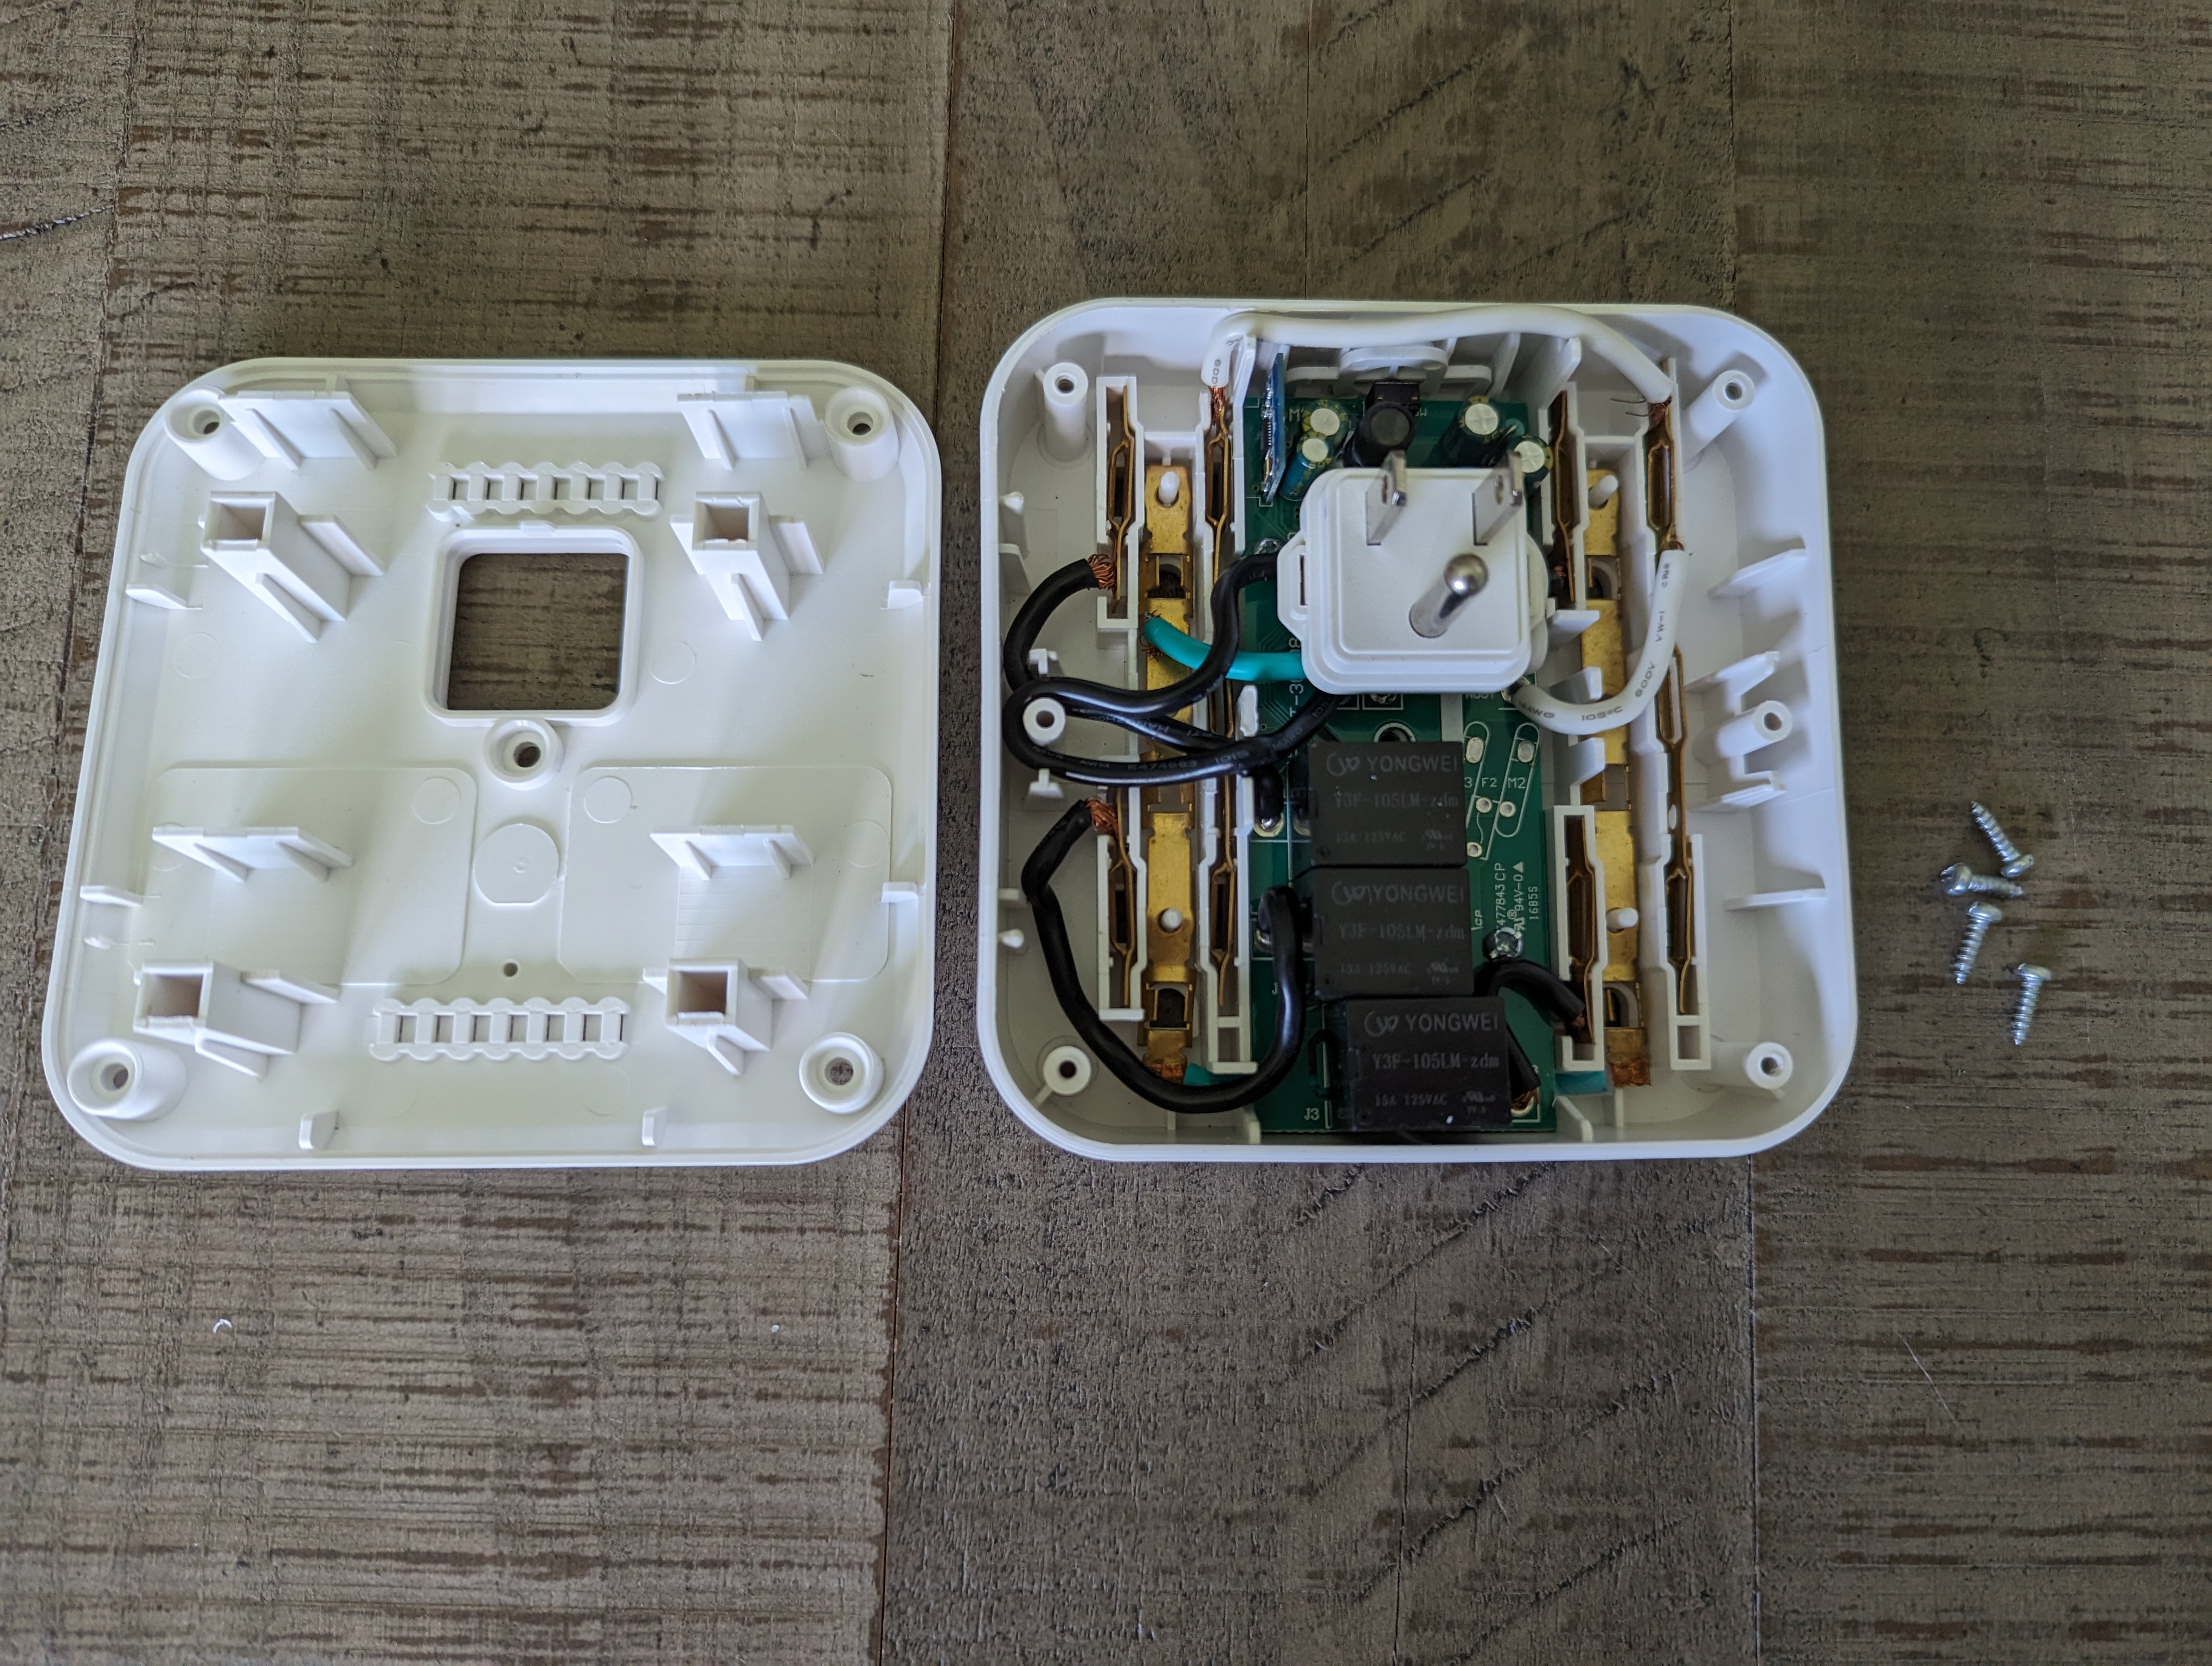
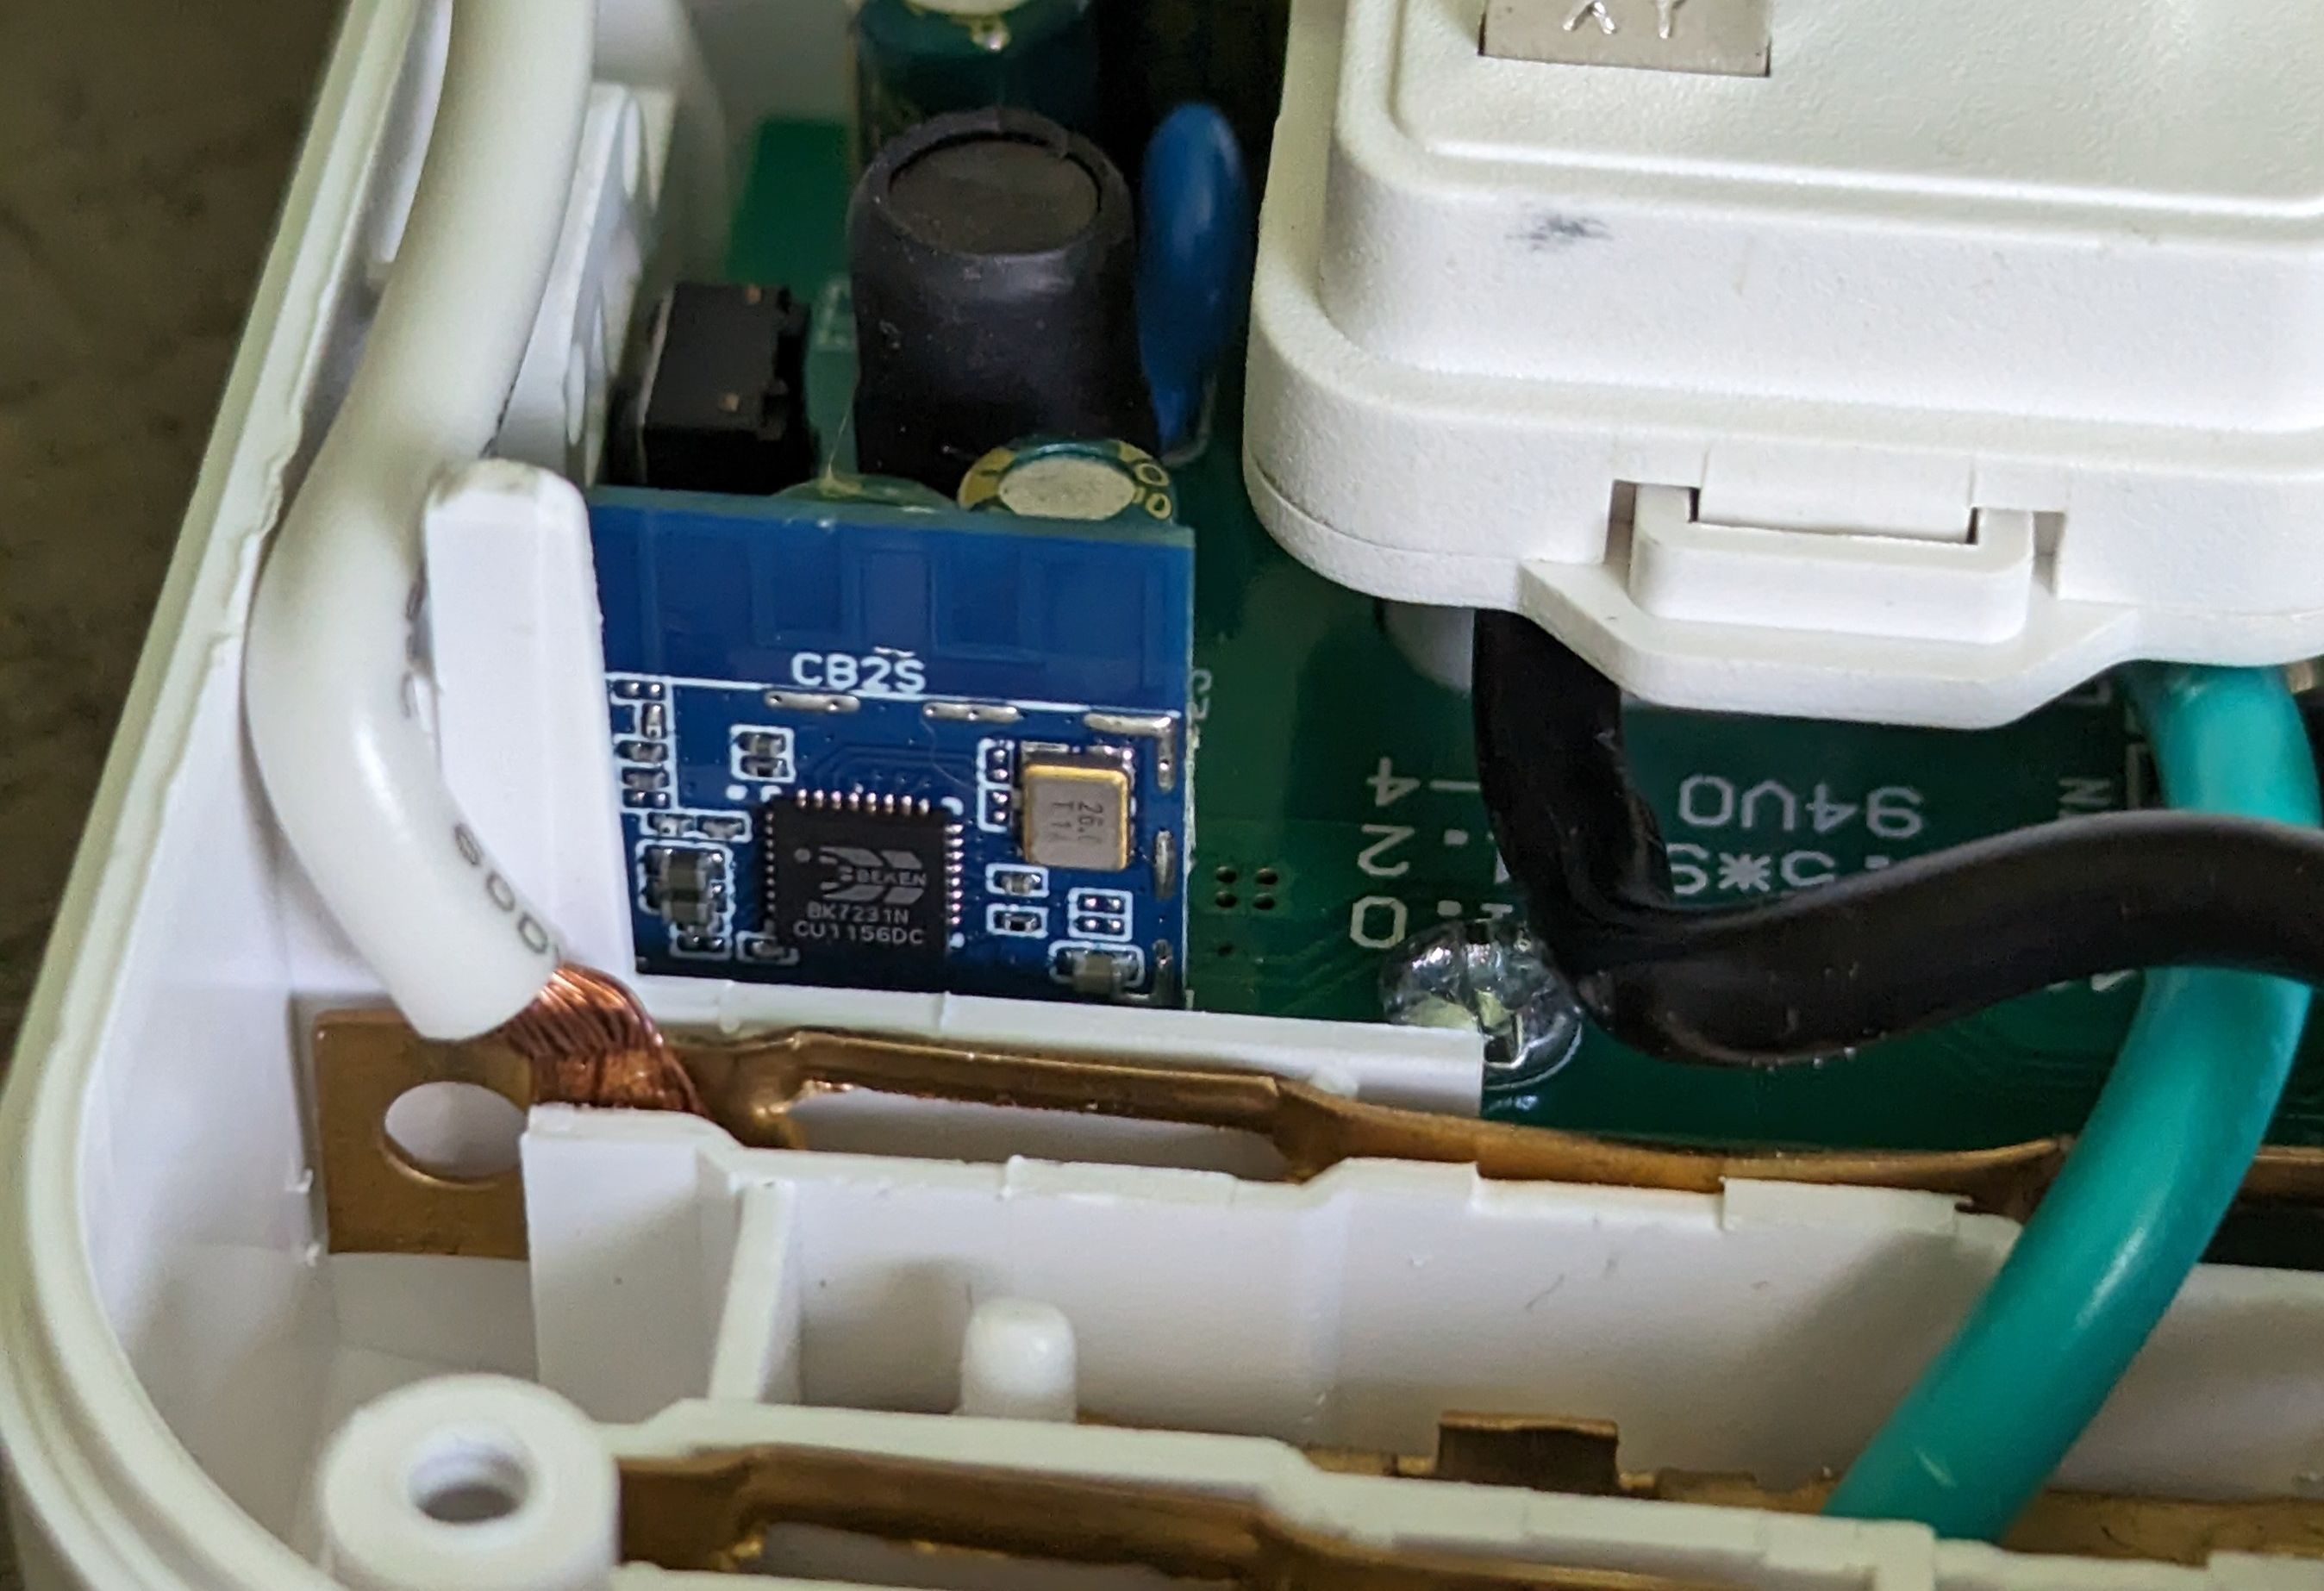
Ignoring the annoying triangle screws, this thing was actually fairly easy to open up. The spaghetti-monster of wires all overlapping each other made me hesitant to take it apart any further, though.
Observations
- This device has a CB2S microcontroller, which is a Tuya chip based on the BK7231N chipset
- A majority of these microcontrollers have two different pairing modes available by default - standard, and "AP mode"
- There are some known exploits (like tuya-cloudcutter) for these Tuya chips, primarily the Beken-based ones, when using "AP mode"
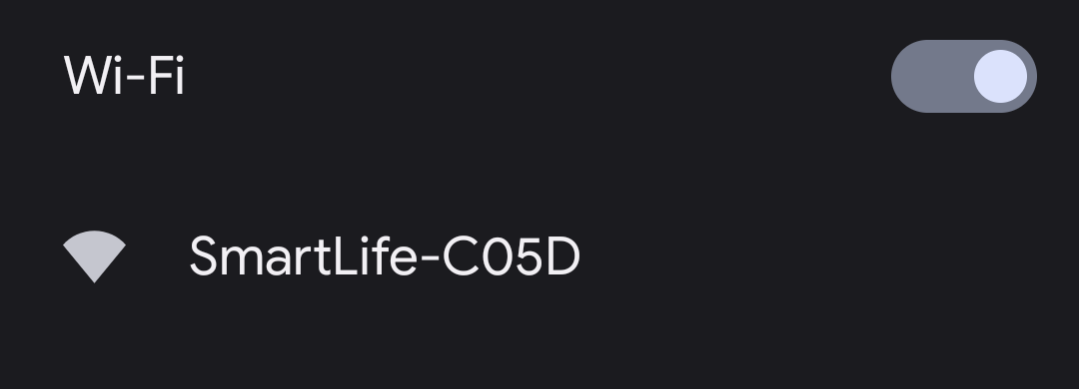
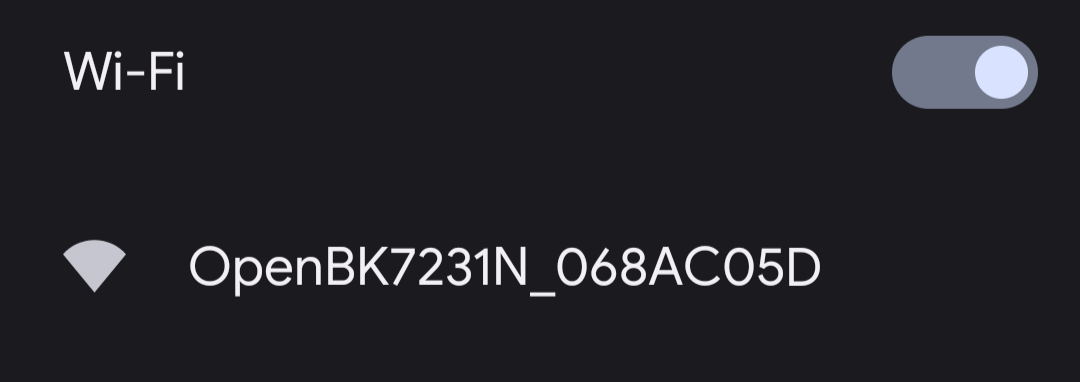
- On this particular device, holding down the power button on top will cause the Wifi LED to flash quickly, meaning it entered pairing mode. Continuing to hold the button will cause the Wifi LED to flash slowly, meaning it entered "AP mode", which can be confirmed by looking for the new wifi network
Goals
- The ability to de-couple it from the Philips/SmartLife apps
- The ability to install custom firmware (like OpenBeken) wirelessly
The Process
Make sure you have docker installed and the tuya-cloudcutter git repo cloned. Then you can run ./tuya-cloudcutter.sh, like this:
r3pwn@hostname:~/Desktop/tuya-cloudcutter$ sudo ./tuya-cloudcutter.sh
Building cloudcutter docker image
Successfully built docker image
1) Detach from the cloud and run Tuya firmware locally
2) Flash 3rd Party Firmware
[?] Select your desired operation [1/2]: 2
Loading options, please wait...
[?] How do you want to choose the device?: By manufacturer/device name
> By manufacturer/device name
By firmware version and name
From device-profiles (i.e. custom profile)
[?] Select the brand of your device: Philips
Onforu
Orbecco
OverMax
PHOPOLLO
Pegant
Peteme
> Philips
Phopollo
QNCX
Qiachip
RTX
Rabit
STITCH
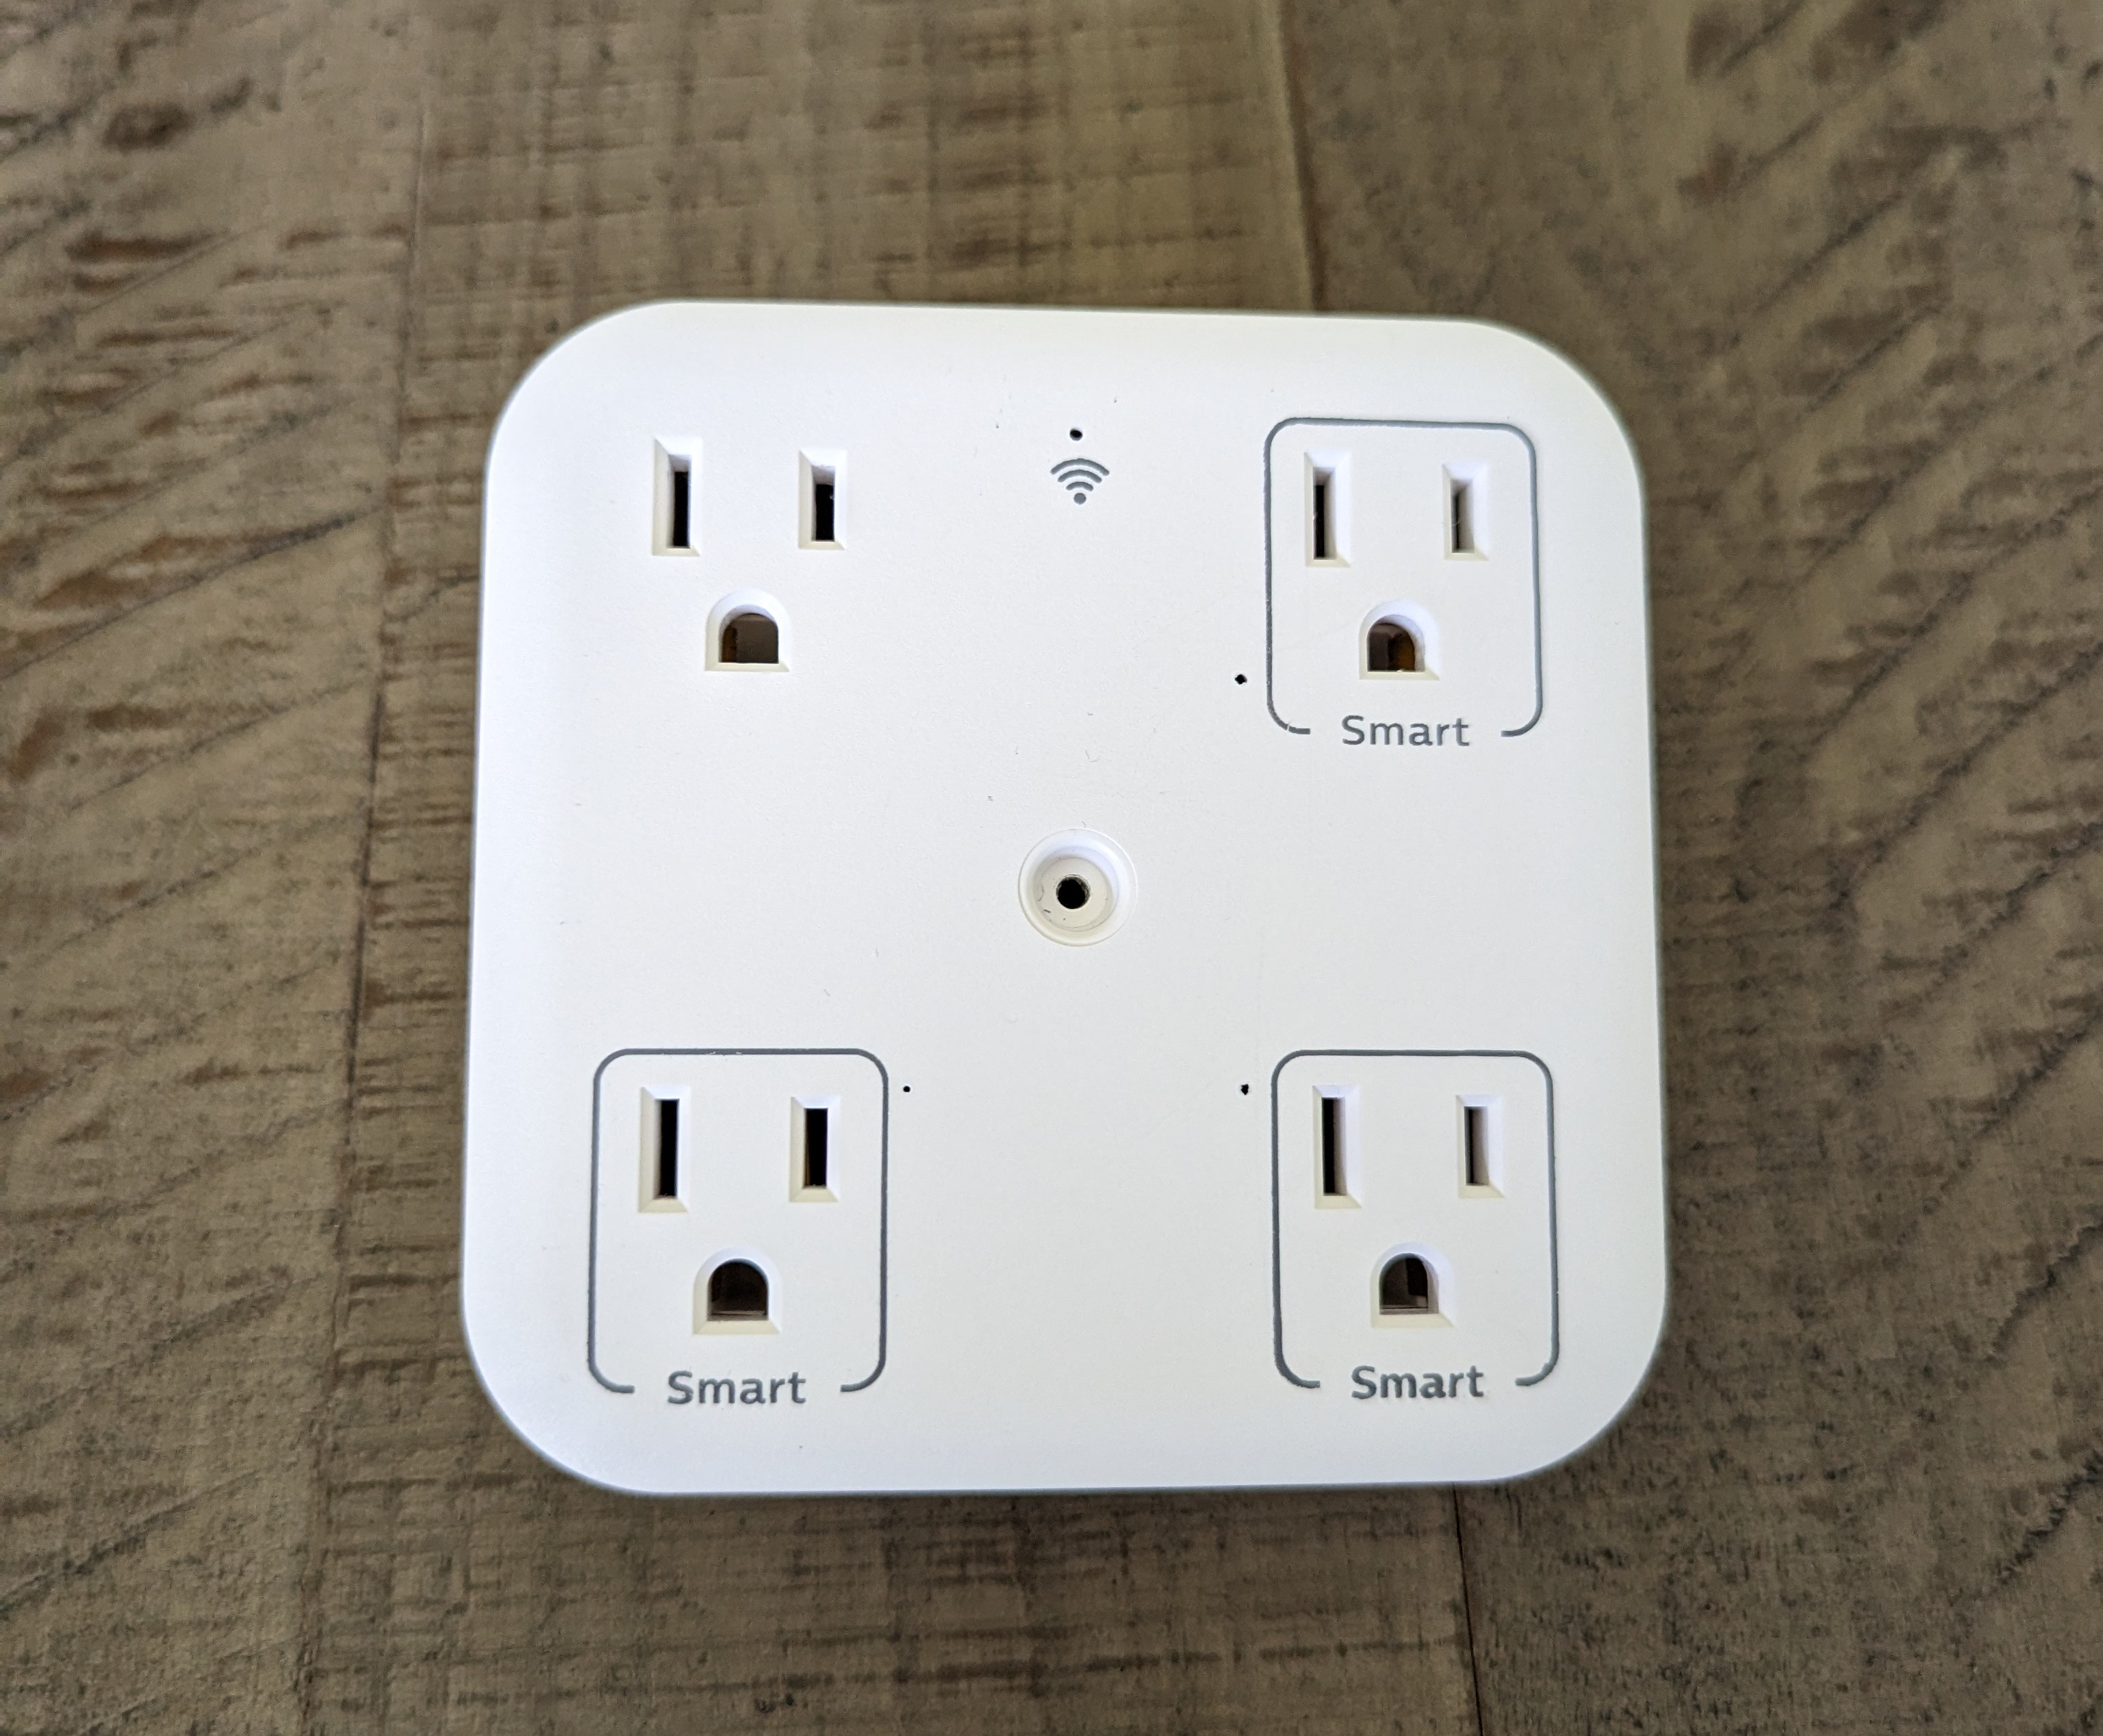
[?] Select the article number of your device: SPP4311WF-37 4-Outlet Wi-Fi Smart Wall Tap
> SPP4311WF-37 4-Outlet Wi-Fi Smart Wall Tap
SPP9068BF-37 Surge ProtectorOr, if you want to skip all of the menu navigation, you can specify the profile directly with -p philips-spp4311wf-37-smart-wall-tap, like this
r3pwn@hostname:~/Desktop/tuya-cloudcutter$ sudo ./tuya-cloudcutter.sh -p philips-spp4311wf-37-smart-wall-tap
Building cloudcutter docker image
Successfully built docker image
1) Detach from the cloud and run Tuya firmware locally
2) Flash 3rd Party Firmware
[?] Select your desired operation [1/2]: 2
Loading options, please wait...

Performing safety checks to make sure all required ports are available
Checking UDP port 53... Occupied by systemd-resolve with PID 695.
Port 53 is needed to resolve DNS queries
Do you wish to terminate systemd-resolve? [y/N] y
Attempting to stop systemd-resolved.service
Checking UDP port 67... Available.
Checking TCP port 80... Available.
Checking TCP port 443... Available.
Checking TCP port 1883... Available.
Checking TCP port 8886... Available.
Safety checks complete.

[?] Select your custom firmware file for BK7231N chip: OpenBeken-v1.17.130_bk7231n.ug.bin
   ESPHome-Kickstart-v23.07.13_bk7231n_app.ota.ug.bin
 > OpenBeken-v1.17.130_bk7231n.ug.bin
Now here's where the fun starts! I selected the option to flash a custom firmware, then selected OpenBeken, but you can choose either the local tuya firmware or ESPHome-Kickstart, if you wish.
Selected Device Slug: philips-spp4311wf-37-smart-wall-tap
Selected Profile: oem-bk7231n-plug-1.1.4-sdk-2.3.1-40.00
Selected Firmware: OpenBeken-v1.17.130_bk7231n.ug.bin
Cool, all of this looks good! Cloudcutter provides easy instructions to follow after that, like telling you when to enter AP mode, etc. Do note that if you're having trouble getting the device to respond by pressing the button (trying to reboot to AP mode the second time), you may need to briefly unplug/re-plug the device from the wall.
And if all goes well, you should see some output that looks like this:
Firmware update progress: 98%
Firmware file has been sent and MQTT reported a progress of nearly complete.  Waiting 15 seconds to ensure flashing completes.
Flashing should be complete.  It takes about 15 seconds for the device to reboot and verify the flash was valid.
Please wait about 30 seconds then look for signs of activity from the firmware you supplied (either watch for AP mode or check if it joined your network).
Device MAC address: RE:DA:CT:ED:AD:DR
And just a few seconds later, you should see this:
Making the device work... again
Awesome! Now, the device is broadcasting an access point, but doesn't do much aside from that. That's because it doesn't know what it's supposed to be (these chips are used for a wide range of purposes, from light bulbs to smart sockets, to smart humidity sensors, etc). In the next couple of steps, we will tell it that it has 3 "relays", a wifi LED, and a button that toggles all relays, and exactly what pins those are connected to on the microcontroller.
Joining your wifi network
The first step will be to connect to that new "OpenBK_XXXXXX" wifi network that the device is broadcasting, and visit the default gateway of 192.168.4.1 in a browser. This will bring you to the device's configuration page.
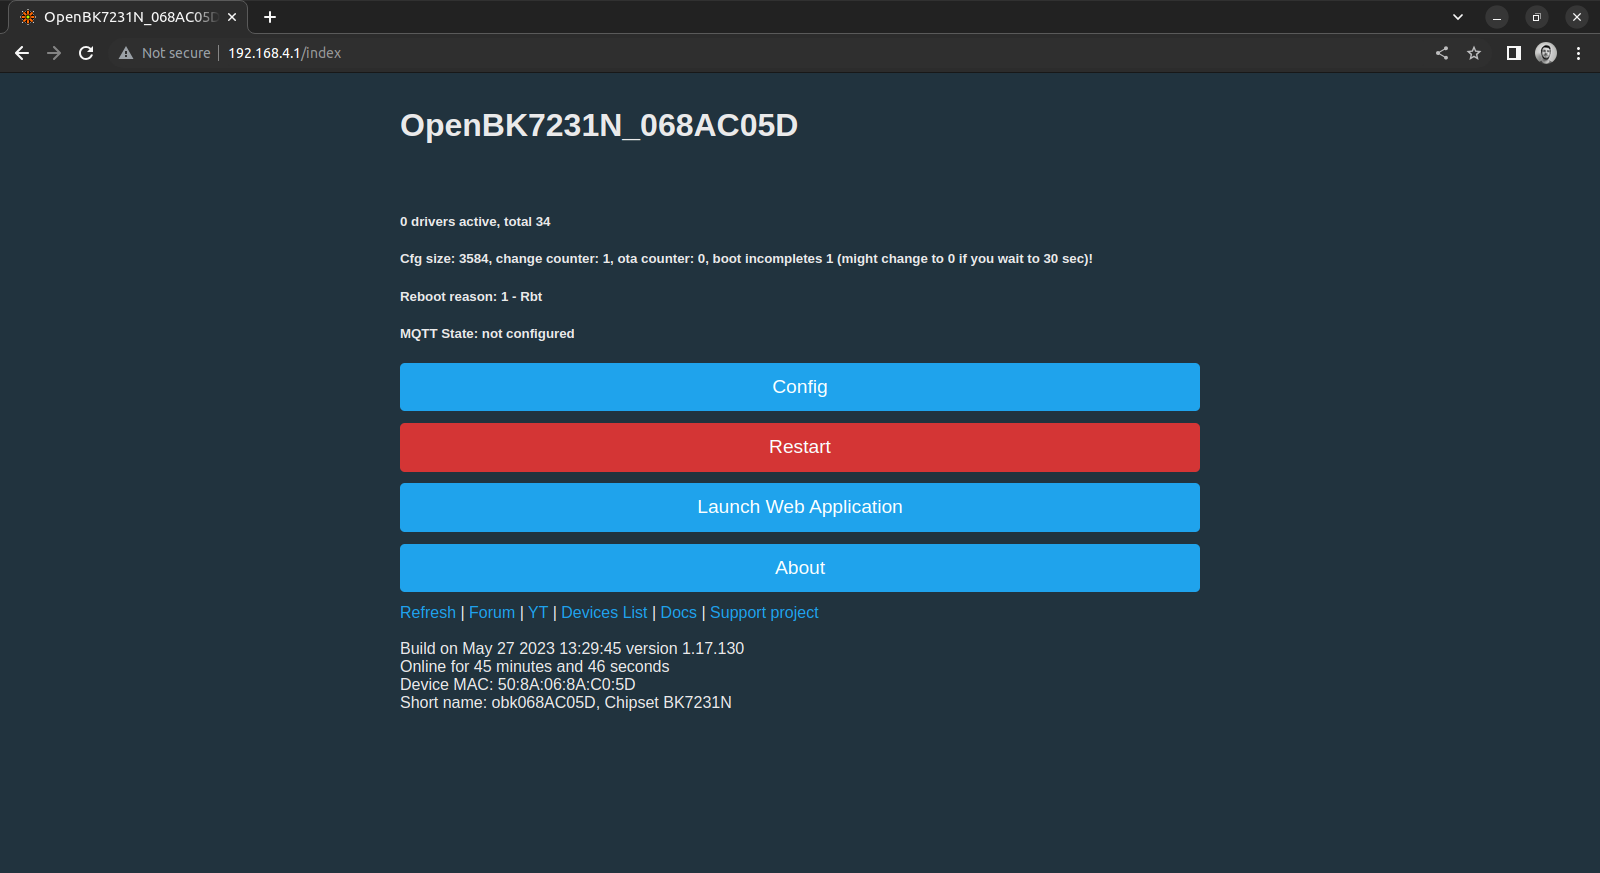
If you then go to "Config" -> "Configure WiFi", you can tell the device which wifi network to connect to, and (optionally) provide a fallback.
You will then need to re-connect to your previous wifi network and discover the device's new IP address (which should be visible in your router's settings)
What is my purpose?
Now we get to tell our device all about what it does. Fortunately, there's an incredibly easy way of doing this.
On your device's main webpage, click the "Launch Web Application" button, then navigate to the "Import" tab at the top.
Once you get there, copy and paste the entire contents of the device's cloudcutter config into the text box on the left.
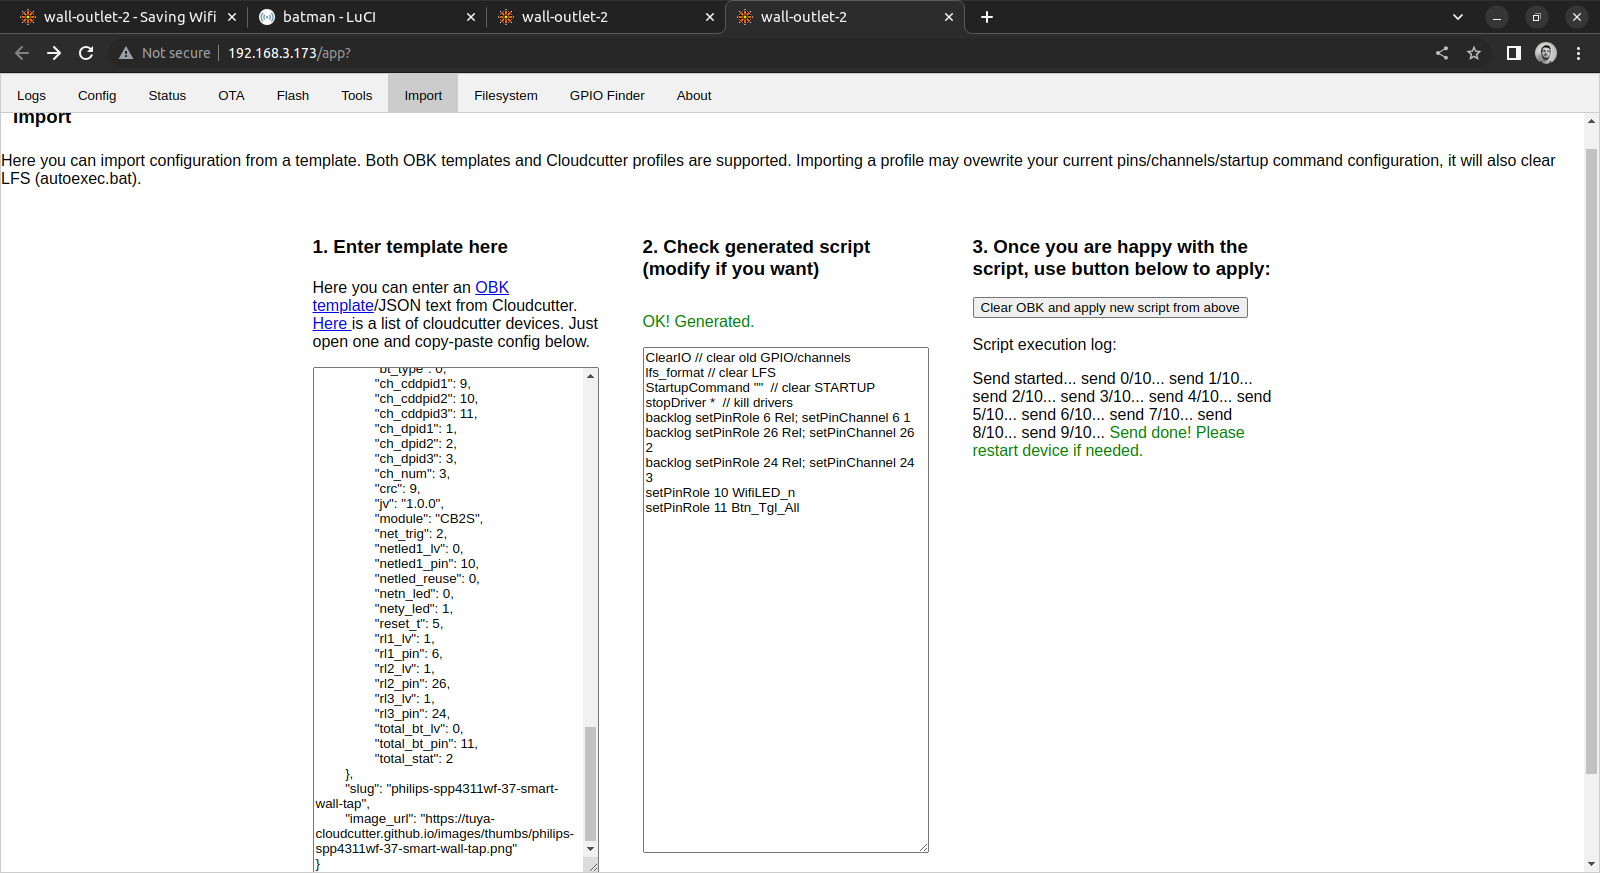
This should populate the middle text box with something like this (without the comments):
// these 3 commands set pins 6, 24, and 26 as Relays on different channels
backlog setPinRole 6 Rel; setPinChannel 6 1
backlog setPinRole 26 Rel; setPinChannel 26 2
backlog setPinRole 24 Rel; setPinChannel 24 3

// this sets GPIO Pin 10 as our wifi LED. The "_n" means that the values are inverted
setPinRole 10 WifiLED_n

// this sets GPIO Pin 11 (our top button) as a toggle for all of the relays
// you can customize this to only toggle one of the relays, etc.
setPinRole 11 Btn_Tgl_All
If that all looks good to you, go ahead and click that "Clear OBK and apply new script from above" button, go back to the device's main webpage, and reboot.
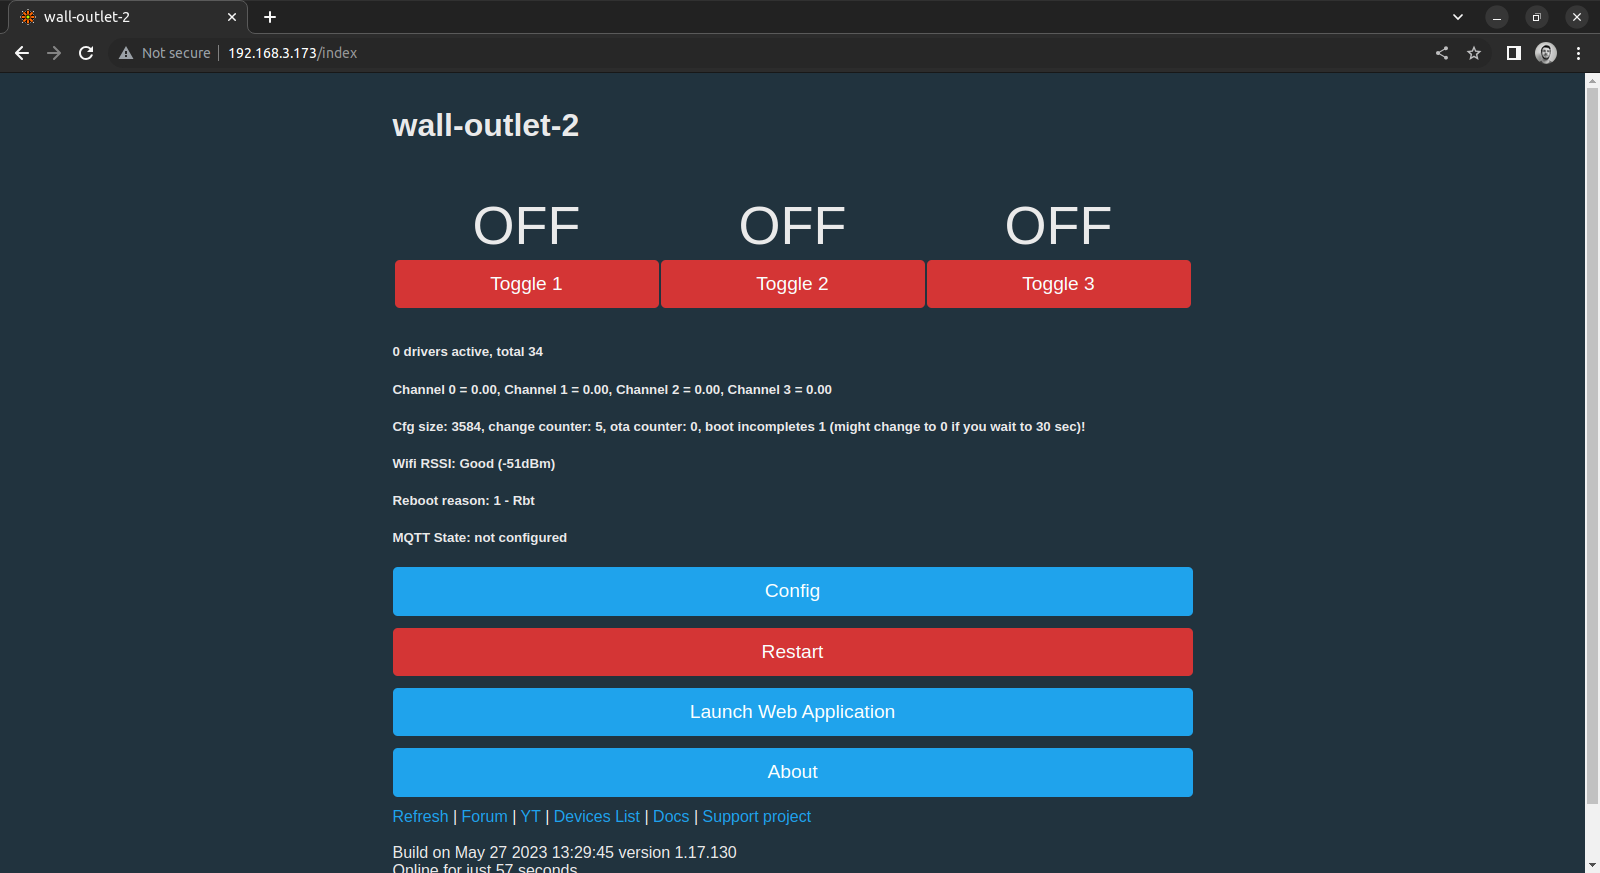
Voila! You can now change the MQTT settings to add it to Home Assistant, change the hostname like I did, or explore some of the other options available in OpenBeken.
Where can I get one?
I've spotted these for sale in several places:
(Being a member of the Amazon Affiliate program, I earn from qualifying purchases)
10/3/2024 Update: I have since switched my outlets to use ESPHome, now that ESPHome natively supports Beken-based devices. You can use this config as a base